Thursday, September 12, 2013

Lacto-fermentation


Lacto-fermentation, or lactic acid fermentation, is a process in which  starches and sugars are converted into cellular energy and the metabolite lactate.  The most commonly fermented products are yogurt and sauerkraut.  Our ancestors were unaware of the benefits of these types of foods and used this process to preserve foods at a time when refrigeration was not an option. There are two stages involved - in the first stage the harmful bacteria gets killed off and in the second stage the beneficial bacteria gets to work creating an environment that safely preserves the vegetables/milk and gives them that tangy deliciousness!

I've long been wanting to try making my own sauerkraut  not just for it's deliciousness but also for the health benefits. Besides prolonging the life of food, lactic acid fermentation increases the nutritional value(vitamins) of food, making it more digestible(enzymes) and promotes the healthy growth of flora (probiotic bacteria) throughout the intestine.  It also contains antibiotic and anti-carcinogenic substances.  It has been credited with curing indigestion as well.

I'm all for a healthy gut as I believe your digestive system is the gateway to overall body health.  It all starts with your stomach and what you put into it!  I think it was Hippocrates who said "let thy food be thy medicine and thy medicine be thy food".  Heart disease and cancer are the biggest killers in north america and it's no secret that both of these diseases are linked to the foods we eat as well as our lifestyles. 

I make my own yogurt on a regular basis but this is the first time that I have tried to make my own sauerkraut.  You can purchase one of those professional but expensive fermentation crocks or take the cheap route like me and do it in a canning jar or the ceramic insert from your crockpot/slow cooker.  Don't get me wrong - I would seriously love to have a Harsch crock - I just can't justify the cost for one right now.  The main thing is making sure that the equipment you use is clean and sterile and that the foods you choose to ferment are fresh and preferably organic and free form pesticides and fertilizers.

For my first vegetable ferment I chose to make basic sauerkraut using just cabbage and salt.   Use a non iodized salt such as  himalayan pink.

Ingredients:

1 head of green or red cabbage (4-5 lbs)
3-4 tablespoons himalayan pink salt or other non iodized salt

Equipment:

sharp knife
cutting board
crock or large jar to hold the cabbage while it ferments
something to weigh down the cabbage and keep it below the juice


Method:

Clean your jar or crock (whatever vessel you choose to hold the cabbage while fermenting) with soapy water and rinse well.  Scald it with boiling water or if heat proof, do what I did and heat it in the oven at 210 degrees for about 10 minutes.  Let it cool while you are shredding your cabbage.

Wash the cabbage and remove any discolored or damaged outer leaves.  Peel off a couple of larger leaves and save to use to hold down your shredded cabbage - more on that later.

With a sharp knife quarter your cabbage and remove the core.


Slice each quarter into shreds, thick or thin according to your preference.  (I knew an old Croation woman who used to ferment the whole head intact to use the leaves for cabbage rolls and it worked out fine!)  Layer the shredded cabbage in a large bowl, sprinkling with salt as you go to start the softening process.


With clean hands, massage the cabbage with the salt for about 10 minutes to release the juice in the cabbage. Alternately you can pound it down with a potato masher or wooden spoon if you don't want to get your hands dirty! One whole cabbage shredded looks like a lot of cabbage but once the juice is released it will shrink down considerably.  You will want enough juice to cover the shreds while they are fermenting.  At this point you can cover it and let it sit at room temperature for a couple hours while you do something else.  The salt will continue helping to release the juice.


After a couple of hours, massage or pound the cabbage shreds for a few minutes - you will notice that quite a bit of juice has accumulated in the bowl.  It is now time to put it into the container it will ferment in.  Pack it down firmly making sure to get out any  air pockets and to force the juice to the top to cover it.  If you still do not have enough juice to do this you may add enough filtered water to cover it.  If using a canning jar, make sure the cabbage/juice does not go up past the shoulder of the jar or it may overflow when it ferments.


Take the large leaves you saved at the beginning and use them to cover the shreds and hold them down under the juice.  You will need some kind of a weight to place on top.  You can use a heavy glass plate, a large unused ziplock baggie filled with filtered water, or a smaller jar filled with water. You want to make sure the cabbage is kept below the juice to prevent it coming in contact with the air.


I used a large flat bottomed pyrex bowl that was heavy enough to keep it lower than the juice and then  covered it with a food grade plastic wrap to keep dirt out.  The lid of the crockpot will keep it weighed down.  After about 24 hours you could see my cabbage was already fermenting by the bubbles forming in the juice.  Don't be alarmed if after a few days your ferment becomes a little odorifous for a couple of days - that seems to be a part of the first stage in fermentation and after the first week it should start smelling more like sauerkraut.  Let it ferment for 4-6 weeks in a cool place (70F or 20C).  I did not experience this, but it is apparently quite common to find a little mold form on the top which you can just remove as you find it.  You can taste your kraut along the way to see how the fermentation is going, just be sure to use clean utensils and keep the cabbage covered with it's juice. When your kraut is ready remove the larger leaves, and if using a crock transfer the sauerkraut with it's juice to clean jars and store in the refrigerator for up to a year - if it lasts that long!


After four weeks my cabbage turned into this crisp, tangy, tasty, oh-so-good-for-you, lovely sauerkraut!  It's at it's finest eaten raw as heating destroys the enzymes, probiotics and vitamins (as does pasturization and canning).  It is, however, excellent tasting cooked as well so consume it both ways! 


Make an effort to include fermented foods in your daily diet.  They will improve your digestion and help you to absorb the nutrition in your foods.  There are many fruits and vegetables that can be fermented so don't limit yourself to just cabbage.  Currently I am fermenting more sauerkraut and also some lemons, and I plan to try my hand at making some vegan kimchi in the near future.


These are the lemons I started about 10 days ago - they still have another 4 days or so to go.   I fashioned an air-lock system using a plastic wide mouth lid (Bernardin) with a hole drilled, and parts bought from a wine supply store for less than $1.50.  The air lock allows the fermentation gasses to escape without exposing the contents to air where mold can breed.  This would also work with your other fermentations.


What do I plan to do with all that sauerkraut?  Eat it of course!


Sunday, August 25, 2013

I'm back...


Wow, it's hard to believe it's been about 4 months since I last blogged.  A lot has hanged since then including a 2000 kilometer move .  My journey started earlier this year when my  81 year old mother was diagnosed with lung cancer and scheduled for surgery to remove it.  She pulled through the surgery with flying colors but then developed some blood clots which led to her having a small heart attack and then a blockage in one of her legs requiring further surgery.  For awhile there it was not looking very promising.

We decided to leave our jobs and move back to the east coast where she lived (and where I grew up) so that she could remain in her home with our assistance and companionship. It was a sudden decision and we didn't have a lot of time  and so we were very occupied with sorting, packing and making arrangements to move our home and cats.  My mother is a real dear and has made these changes easy to adjust to, and I'm happy to say that  she has recovered very well from all that she went through and has been declared cancer-free.  She's a real trooper and an inspiration!  We are still looking for new jobs but are hopeful we will soon find something.  In the meantime I will have lots of time to experiment with new recipes and ideas to blog about! 


Sunday, April 7, 2013

Going bananas


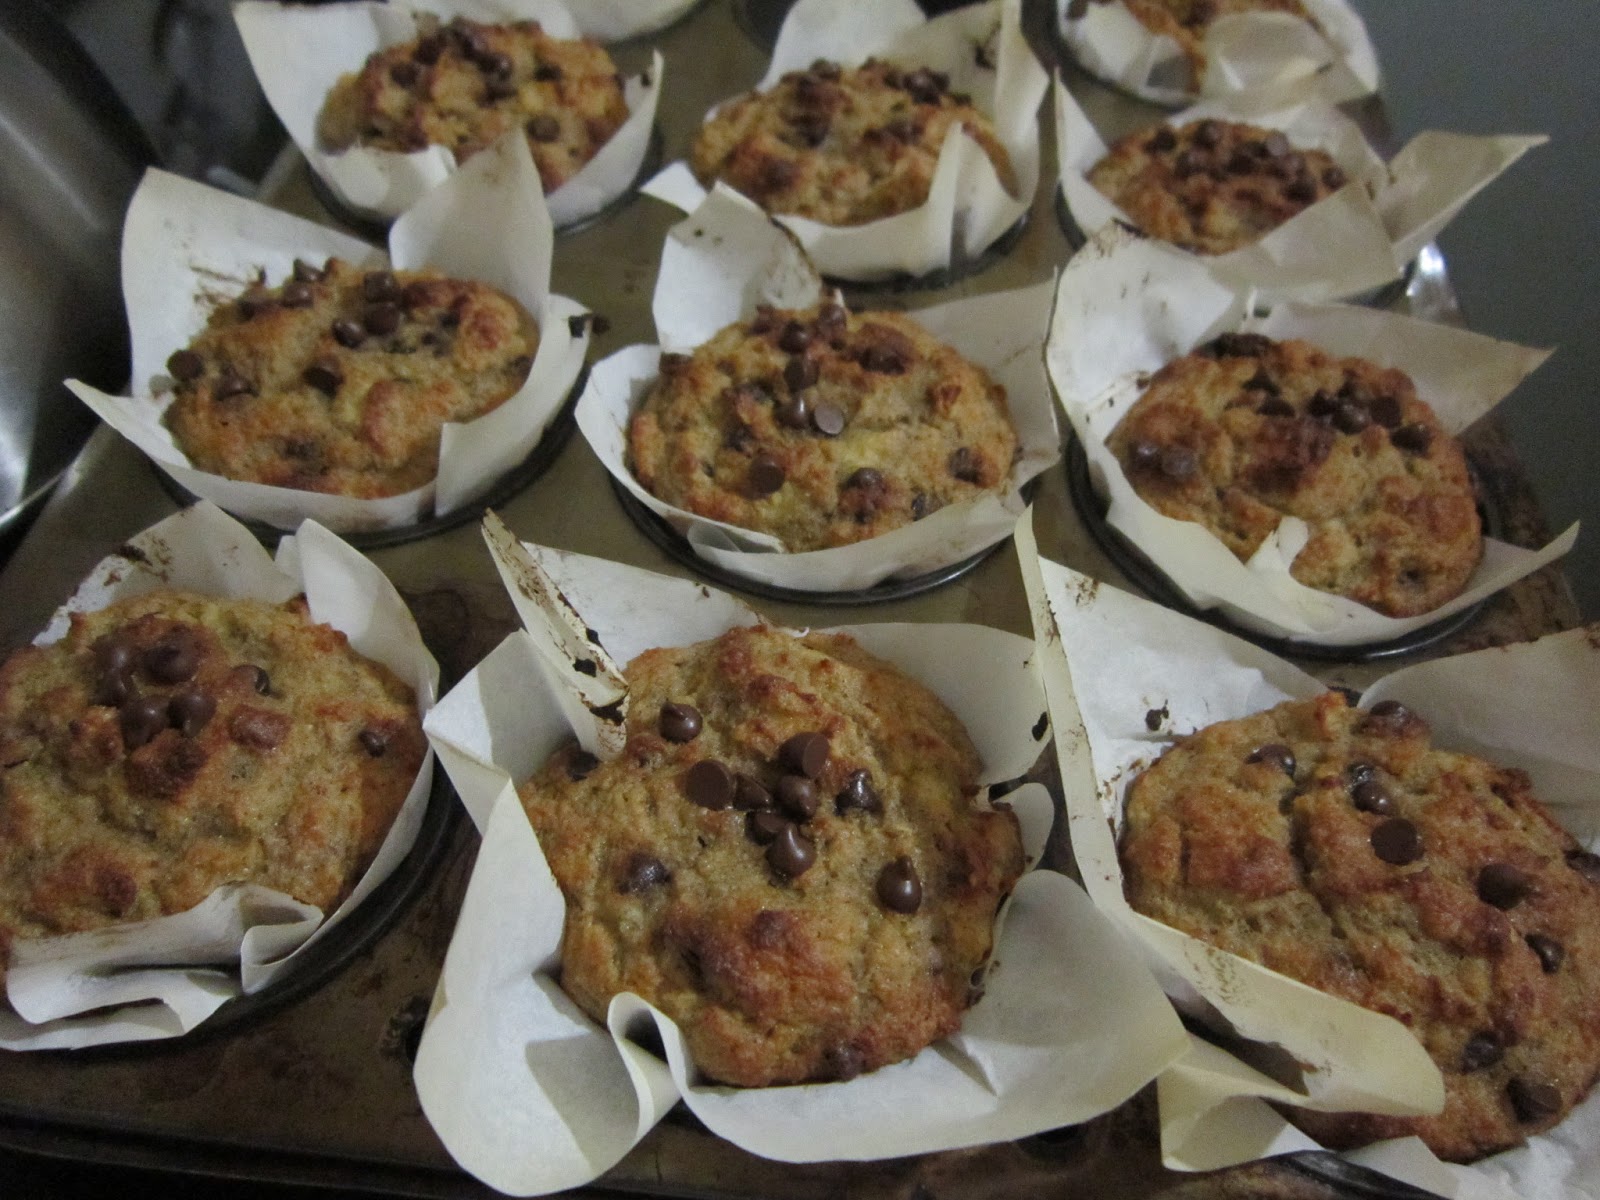
At some point in your life there will come a time when too many bananas have been bought and not enough eaten.  When this happens to you and you have bananas that are too ripe,  make muffins!  Muffins are quick and easy and the perfect take-along, hand held food. These low glycemic  muffins are made with coconut flour and coconut oil making them gluten free, high fiber, protein rich, and low carb, and if you skip the chocolate chips they become sugar-free.  They are moist and delicious.

You will notice when baking with coconut flour that the recipes use a lot of eggs .  That's because coconut flour is so dense and absorbent and the eggs prevent the baked product form getting too dry , giving it a more cake-like texture.  Also, because it is so dense you only need to use a fraction of what you would need if using other flours.  You can't substitute coconut flour cup for cup in recipes for other flours due to this.  I think the basic substitution is 1/4 - 1/3 cup coconut flour for every 1 cup of regular flour.  Unless you are very experienced in baking with coconut flour I would recommend using already established recipes because it is quite a bit more expensive than regular flour.


                                             Coconut Flour Banana Chocolate Chip Muffins 


6 eggs, whisked
1/3 cup coconut milk (or any nut milk)
1 tablespoon maple syrup, optional
1/2 teaspoon salt
1 teaspoon vanilla

3/4 cup coconut flour
2 teaspoon baking powder
1 teaspoon baking soda
1 teaspoon cinnamon

1/4 cup coconut oil, melted
1 cup mashed ripe bananas (about 3 med)
1/2 cup dark chocolate chips
 1/4 cup chopped pecans, optional

Preheat oven to 400.  Line muffin pan (12) with paper liners or parchment.

In large bowl whisk eggs, coconut milk, maple syrup, salt and vanilla.  Set aside.  Measure and mix coconut flour, baking powder, baking soda, and cinnamon.  Sift dry ingredients into egg mixture while briskly whisking.  Mix well.   Stir in coconut oil, bananas, chocolate chips and pecans.

Bake for 18-20 mins.  Cool in pan for 10 min.  Store cooled muffins in closed container in fridge for longer storage. 


Sunday, March 31, 2013

Raw Coconut Rose Macaroons with Pistachios


Aren't these pretty!  I found this recipe by Amy over at Fragrant Vanilla Cake and just had to try it.  She has the most beautiful raw deserts I've ever seen and loves to share her recipes.  I wasn't sure how big  of a piece to use of raw beet to give it it's pretty color so mine turned out darker than the original recipe.  I used a 1/2 inch slice when I should probably have only used an 1/2 inch square cube.  None the less, they still look fabulous!  I have never used rosewater extract before so was a little nervous about it tasting too floral but it has a really subtle flavor that is lovely.


Raw Coconut Rose Macaroons with Pistachios

Macaroons:
3/4 cup almond meal
pinch of sea salt
1/4 cup raw honey
1/2 inch square piece of beet
1 teaspoon vanilla extract
1 teaspoon rosewater extract
2 cups fine shred unsweetened coconut

Glaze:
1/4 cup coconut butter or manna, warmed to liquid
3 tablespoons coconut oil, warmed to liquid
1 tablespoon raw honey

1/2 cup raw pistachios, chopped

In food processor using s-blade process almond meal, salt, honey, beet, vanilla and rosewater until well blended; add coconut and pulse till mixture holds together.  Using cookie scoop shape into 12-14 equal sized balls and dehydrate for 6 hours at 110.  Mix together glaze ingredients and dip tops of balls in glaze and then chopped pistachios.  Place in freezer for 5 mins to harden.


Sunday, March 3, 2013

Homemade Nut Butters


With peanut butter and peanut butter paste product recalls due to salmonella in the news, making your own peanut butter at home seems a much safer alternative.  It's not that difficult if you have a food processor and it's a great way to control the sugar/salt content. You don't have to limit yourself to peanuts - almonds, cashews, hazelnuts, walnuts, sunflower seeds and any combination of these make delicious and nutritious nut butters.  By making these butters yourself from whole nuts you can be assured that the final product does not contain any of the undesirable but allowable "ingredients" (ie: insect parts, rodent hair) found in commercial nut butters.  Plus, you can't get it any fresher than when you make it yourself

Nuts should be a part of your diet as they are rich in energy, protein, antioxidants, vitamins, minerals and omega-3 fatty acids.   They lower bad cholesterol and raise good cholesterol, and help to prevent coronary artery disease.  The fatty acids have an anti-inflammatory effect that helps lower your risk of strokes, high blood pressure and some types of cancers and offers some benefit for rheumatoid arthritis.  Nuts are also said to help you to lose weight because they keep your hunger satisfied longer, are high in fiber, and the fats can raise your metabolism when burning the calories from them.  Keep in mind that they are high in calories so you should stick to portion sizes!

When you buy your nuts in bulk it is even more economical to make your own nut butter at home.  I purchase my natural almonds at Costco for $10/1.36 Kg.  A 500 g (2 cup) jar of almond butter retails for around $10 so that's better than half the cost.  Whenever possible you should use organic nuts but this is not always feasible because of availability and cost.  I use nuts in my cereals and raw foods as well so I go through a lot of nuts and find it too expensive to buy them organic.  I soak my nuts for 8-12 hours to remove the enzyme inhibitors and dehydrate them for storage.  The soaking makes the nut more digestible and they taste better.

Nut butters are wonderful to spread on bread, toasted or plain, to dip celery or apple slices in, or to use in recipes calling for peanut butter.  Mmmm....can't you just imagine hazelnut butter chocolate chip cookies!  With the addition of cocoa and a little coconut palm sugar you could even make your own hazelnut-chocolate spread.  Now you want to make some nut butter don't you!


                                                    How to Make Nut Butter at Home


For 1 1/2 cups of nut butter use 2 cups of nuts.  Spread the nuts on a cookie sheet with sides and roast in your oven at 350 for 5-8 mins.  Remove from oven and allow to cool slightly.


Place slighly cooled nuts in your food processor fitted with the s-blade and process till it looks like crumbs.  If you are using coconut sugar and/or salt add to processor now. 


Continue to process until it becomes smooth.  You need to have a bit of patience with this as it takes some time for the oils to release and the nuts to become creamy but it will happen!  I would say it takes a good 5 minutes.


For the pictured nut butter I used 1 cup of natural almonds, 1 cup of hazelnuts and 1/4 teaspoon of sea salt.  I do not like to add sugar, but if that's your thing I would suggest using a tablespoon or less.  Store in a sealed container in the refrigerator for about a month.  One tablespoon of this nut butter is 84 calories and has 1.5 g of fiber and 2.5 g of protein.


I hope you will give this a try!

Monday, February 18, 2013

Raw Fig Newtons


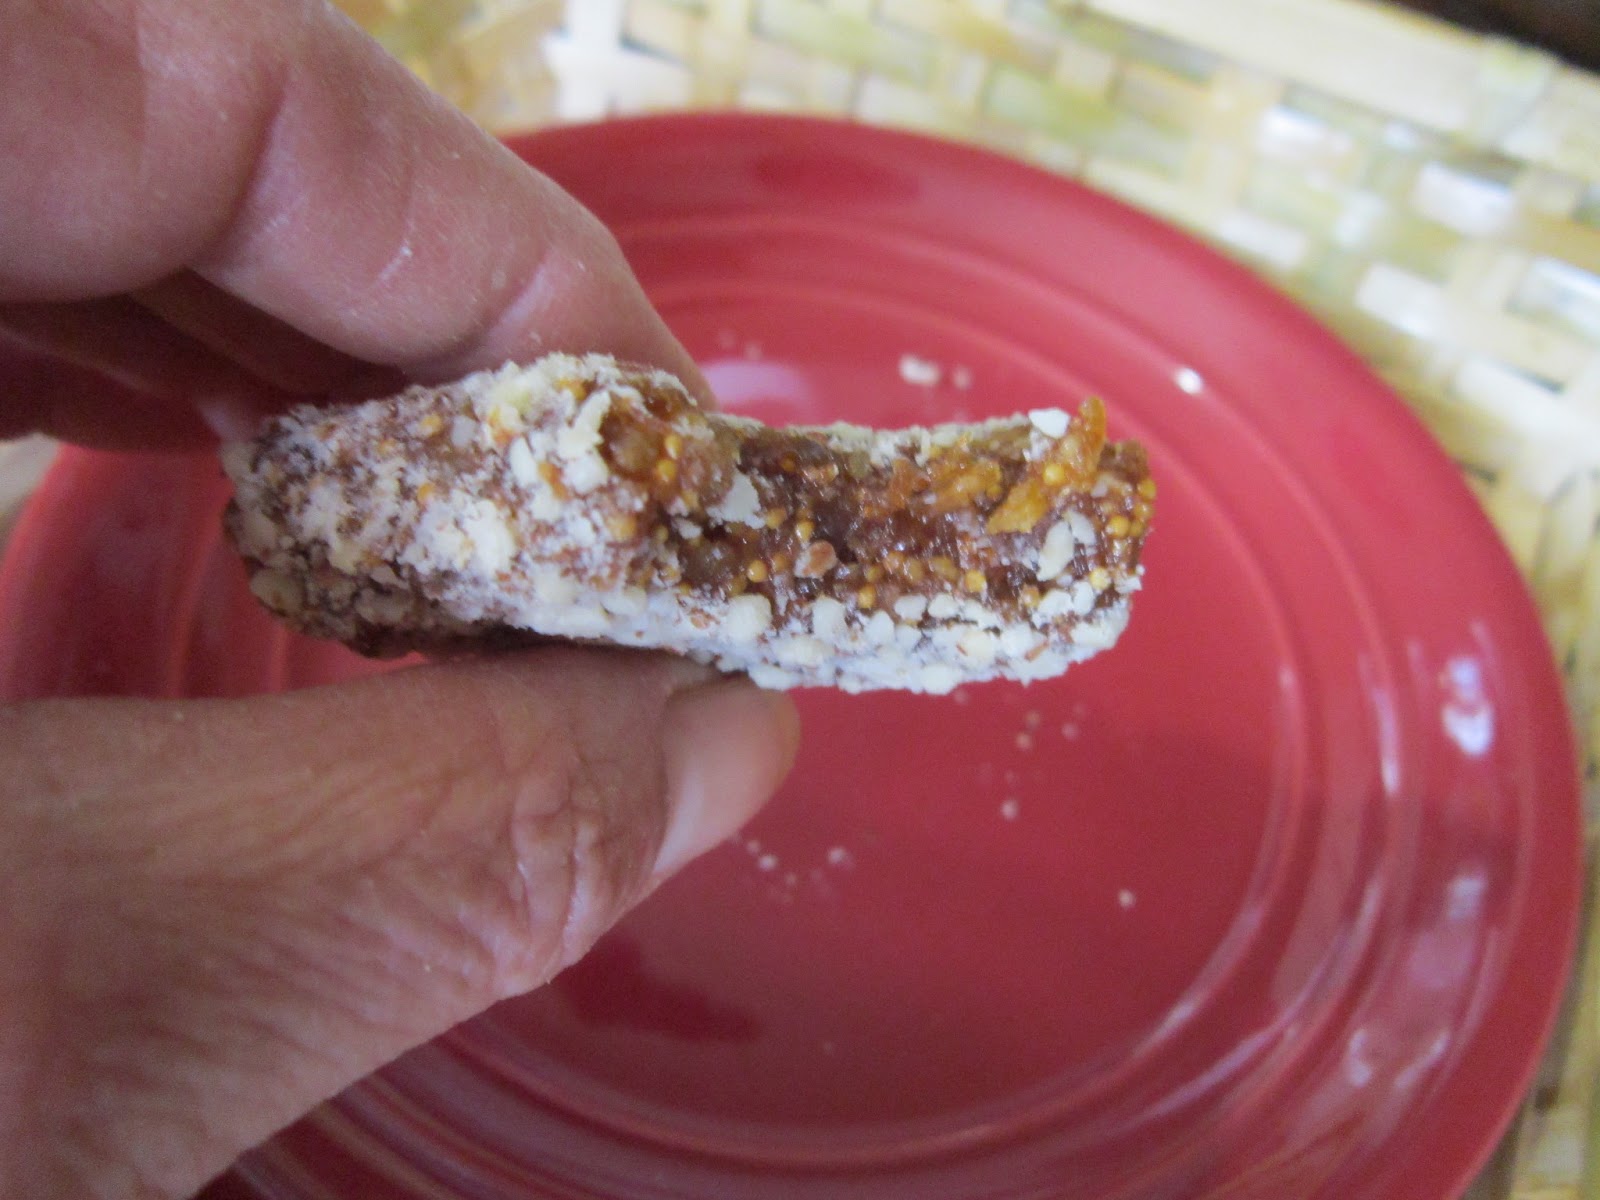
If you like fig newtons you are gonna love this healthy raw alternative!  Figs are fat-free and a great source of potassium, calcium, iron and fiber.  Keep in mind that dried figs are naturally high in sugar and eat accordingly (meaning you should always try to stay within the normal daily recommendations for sugar).  These are a perfect sweet treat for kids to enjoy with a cold glass of milk.  The ingredients are simple and few and they're  easy to make.  This version of an old favorite is gluten and dairy free, raw and vegan.


Raw Fig Newtons


1/2 cup natural almonds, ground

3 cups dried figs, cut up with hard stem-ends removed
1/2 tablespoon ground cinnamon
2-3 shakes of sea salt
juice of a large lemon


Grind nuts using s-blade of food processor into coarse flour; dump onto a large piece of wax paper.  Place  cut up figs, cinnamon and salt in food processor and pulse while adding lemon juice a bit at a time until well incorporated.  This should be quite thick.  I like to refrigerate it for a couple of hours so it's easier to handle.  Divide into quarters  and shape each into 7-8" logs; flatten between sheets of parchment or wax paper and roll in the reserved ground almonds.  With a sharp knife cut each piece into 4 or 5 portions.  Store in fridge.


                                          I hope you enjoy these as much as I do!


I've read that as a country we're losing our ability to feed ourselves and it's largely due to our dependance on imported produce.  Super farms in South America and Mexico ship mass quantities of produce north relatively cheap.  So cheap that local farmers are unable to compete and many are forced to give up on farming or turn to crops not intended for human consumption.  I have also heard that some of the greenhouses around  here are now not growing their own produce  but importing it and packaging it for resale.   I find this trend alarming.  These super farms grow GMO's and they don't even employ a lot of people because of the huge machinery they now use.  I don't need to tell you whose pocket the money goes into.

Sure there are some things that can't be grown locally like bananas, but the next time you buy a cucumber and you have the choice of buying one produced locally or an imported one, buy local even if it cost a little bit more.  Local produce is not picked prematurely and unripened to survive long transport and is much tastier and nutritious.  Fresher IS better. You will help keep our farmers in business and keep the money in our own economy.  Just sayin.


Another thing we can do to lessen our dependance on imported produce is to grow our own in season and preserve the surplus for the winter by dehydrating, freezing or canning it.  These have become long-forgotten arts that need to be revived!  Almost everyone has a computer these days and if you have a computer you have access to information on how to do these things.  There are many ingenuous ways to garden in small spaces including balconies.  I myself would like to see more urban gardening including the (responsible) keeping of chickens for eggs and pest control!  Start small - grow some herbs in window pots, plant a few tomatoes or peppers in patio planters.  Gardening can be a relaxing and rewarding hobby.  Don't you just love this open garden shed...I want!


The concept of buying local should also extended to our other purchases.  I try to buy products that are made in this country even if they are a little more expensive because I know they were made by people who earned a fair wage for their labor and it helps keep jobs in my own country.  Buying local also helps foster a sense of community I think.  Okay....enough of my rant!  Please just give this some thought.


Sunday, February 3, 2013


Just recently I signed up to receive a newsletter and was entered in a draw for a fabulous gift basket full of soaps, a meditation candle and a healing salve.  I was quite surprised to find the email from Vicki Strom at OJAS Ayurveda and Yoga announcing I had won and would soon be shipped my gift basket.  Who doesn't love to get free stuff!  I am so impressed by the loveliness and quality of these soaps that I have to tell people about them.


I had actually forgotten about the draw until I won and then  I went to the OJAS website to see what they were about and I liked what I read about the company.  Please take the time to follow the link to learn about them.  They are fair trade and ethical and the products are all natural.


These soaps are gorgeous.  They are hand made without added fragrance and smell fresh and clean like soap should.  The lather that comes off these soaps is like silk and not waxy or greasy feeling like soaps made with animal fats.  I really like the feel of it on my skin.


These soaps would make lovely gifts and anyone would be pleased to receive them!  They make a fabulous gift for yourself!


Thanks again Vicki for this lovely gift basket - I will enjoy every luxurious moment!


How to teach an old dog new tricks...


French toast the easy (lazy) way.  Bet you didn't know that old waffle iron could do this trick!


Just make a batter out of eggs, a  generous splash of milk, a drop of vanilla and a dash of salt. (I use one egg for every two pieces of bread). Fat and a spatula are not required.  Heat up your non-stick waffle iron according to manufacturers instructions, dip your bread of choice, and let the waffle iron do the rest!  Save on calories, time and mess.  You can top it with your favorite syrup, fresh fruit, or if you are inclined, top with a nicely fried egg and serve with a side of hash browns.  Do this.  Do it right now.  Enjoy!

Sunday, January 13, 2013

What I had for dinner last night...


The above picture proves that I sometimes eat like  like a regular person....pierogies, onions, sour cream, smoked polish sausage and sauerkraut for dinner last night.  And I must say it was delish!  Eating is all about balance and so this morning for my breakfast I had.....


an energizing green drink made with spinach, parsley, ginger root, pineapple, orange and a healthy spoonful of hemp hearts and some pro-biotic powder for gut-health.  For a little extra sweetness I could have added a small banana as well but I don't mind the less-sweet  taste of the greens.  It's a good way to start the day and a good way to get in some of your 5 to 10 a day!  The best part about green drinks - you can customize them to suit your taste.

Lots of stuff going on in my life right now, but I'm going to try and find time to blog more than I have recently.  I have no shortage of things I'd like to share with you!


Wednesday, December 26, 2012

Raw cookies, cereals and snacks part 3


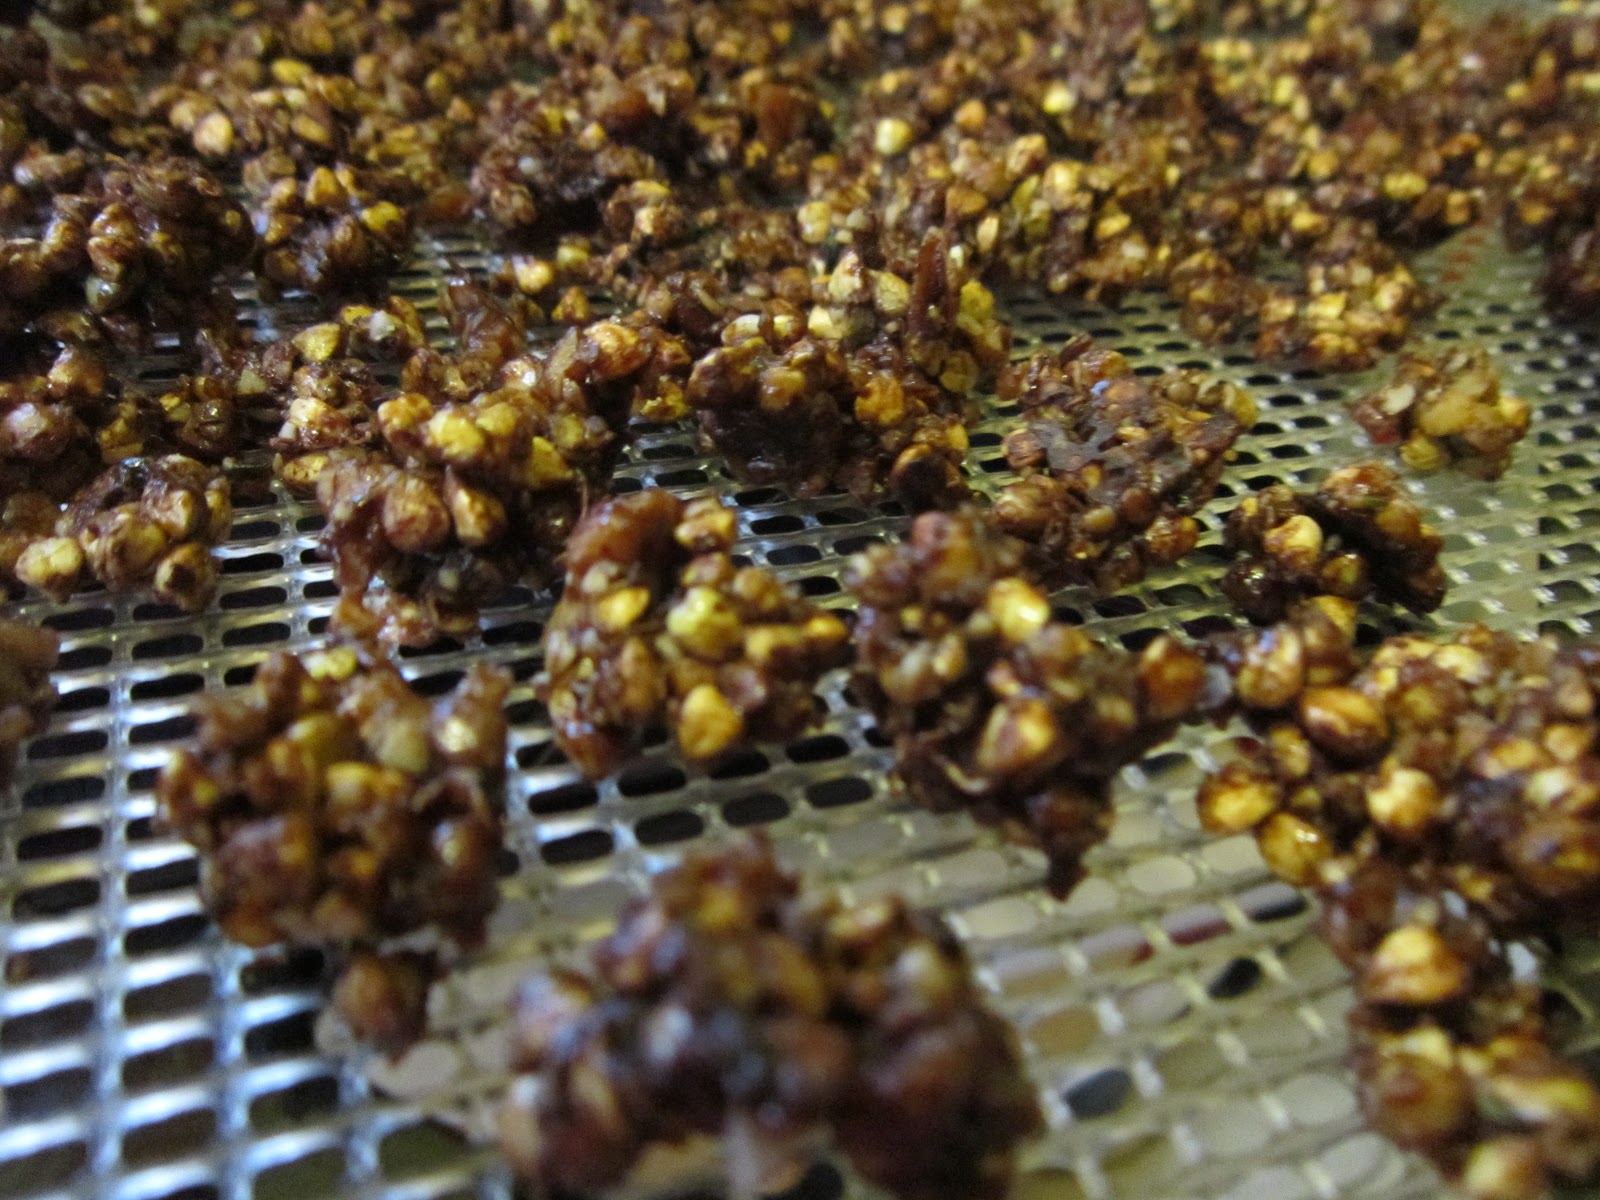
In addition to cereals and cookies, there are many raw snacks and nibblers you can make in your dehydrator.   Above is pictured Peanut Butter Buckwheat Clusters starting with a shot of the buckwheat after I sprouted it, then the mixture as it was dehydrating, and finally the crunchewy, high fiber, high protein, and tasty snack when it was done.  Yum!  This snack is not only raw but gluten free and vegan as well.  It's one of my favorite snacks to make in the dehydrator.

*Peanut Butter Buckwheat Clusters*

3 cups of buckwheat sprouts
1 cup sunflower seeds, sprouted or un-sprouted
1/4 cup un-hulled sesame  seeds
1/2 to 3/4 cup raisins
1 large ripe banana
1/2 cup pitted and chopped soft dates
1 1/2 teaspoon vanilla
1/3 cup of raw honey or maple syrup
1/2 cup natural peanut butter
pinch of sea salt

In large bowl combine buckwheat, sunflower seeds, sesame seeds and raisins.  In food processor,  process into a smooth paste the remaining ingredients.  Mix well with first ingredients and spoon onto teflex lined dehydrator sheets.  Dehydrate at 115 for about 12 hours or until crunchy (raisins will still be chewy).  Stir a couple hours into drying and flip about halfway thru drying time and remove teflex to allow it to dry on the screens.


While dried fruit on it's own is great to eat or as an addition to trail mixes it can also be turned into the above Dried Hemp Honey Apple Slices.   I didn't have the white chia so I used the black variety.  These are chewy, sweet and a fabulous source of fiber.  Kids love them!

If you keep a variety of these healthy snacks on hand you will soon forget about those chips and sugary snack-cakes.  Seriously, I don't even miss them!

I sincerely hope that everyone is enjoying a wonderful and safe holiday season!


Friday, November 30, 2012

Fun foodie penpals!

FPP post Foodie Penpals 


Last month I heard about this group thing called Foodie Penpals.  You sign up for it and then you are paired with one person to send a food package to and one that you will receive a package from.  I thought it sounded like a fun thing to do and it would be interesting as well.   Who doesn't like gifts or surprises!  If you would like to know more about this group or how to participate please visit  The Lean Green Bean.

I was paired to receive a foodie penpal package from a gal named Leslie who co-incidentally also lives in the same city as I.   We tried to arrange a meeting in person but Leslie (who is a student at the local college) had exams and I had work and other matters which kept us both too busy.  We decided a drop off would work well for us both and I was very excited to find her package on my front porch.


Packed in a cute little canvas bag was an assortment of fabulous goodies!   Leslie chose items sure to put anyone in the holiday mood....candycane green tea, gingerbread granola, and blueberry licorice as well as a Larabar, some cute recipe cards to write on, and a nice handwritten personal note.  All of these things are healthy and tasty and I know I am going to enjoy them!


I  had the pleasure of sending Krista in Toronto a package.  This has been such a fun and positive experience for me and I am looking forward to participating again when it starts back up in January.  Thanks again Leslie, and good luck with your studies!


Update:  The gingerbread granola is divine and I can understand why Leslie told me it was her favorite!


Sunday, November 18, 2012

Raw cookies, cereal and snacks part 2


Raw cereal is also something that I like to make in my dehydrator.  Kids love cereal and there's a little kid in all of us!   Making your own cereal is the best way of controlling how much sugar your kids (or you) are getting from their cereal breakfasts.  Parents want to give their children good things to eat and it's easy to believe that cereal is a healthy start to their kids busy day, but in reality most boxed cereals are high in sugar and sugar has no nutritional value.  Myself, I would question the quality of the other ingredients as well as I have read that most commercial cereals today have been made with GMO ingredients.  No frankenfood for me thanks!

Healthy cereal can also be tasty cereal.  It has to be or the kids won't eat it.   I have to warn you - if it tastes too good, you will be making a lot of it!  It not only makes a great breakfast but also a great snack. One of my favorites is chocolate buckwheat clusters, pictured below.  It's simple, crunchy and sweet enough, and features sprouted buckwheat and raw cacao.  Tastes great with some sliced bananas or raspberries and your favorite milk or nut milk.

Cacao Buckwheat Clusters
*Cacao Buckwheat Clusters*

1 cup (sprouted and dehydrated) buckwheat groats, soaked for 20 mins and drained well
1/3 cup unsweetened coconut, or your fav chopped nuts, or sunflower seeds
5-6 tablespoons maple syrup
2 generous tablespoons cacao powder
generous pinch of sea salt

Mix well and spread on teflex dehydrator sheets and dehydrate 12 hours or overnight at 110 until crunchy.  Stir after a few hours to form clusters.  For last couple hours you can remove teflex sheet and continue drying on mesh sheet.  Makes 4-6 servings.  Store in airtight container.


This is another simple cereal using sprouted buckwheat and fresh strawberries,  It's light, crunchy and goes great as a topping for bananas and plain yogurt  (my mouth is watering just thinking about it).  Move over special k with strawberries - there's a new kid in town!

Strawberry Buckwheat Clusters
*Strawberry Buckwheat Clusters*

1 1/2 cups (sprouted and dehydrated) buckwheat groats, soaked for 20 mins and drained well
2 cups fresh, ripe strawberries sliced and roughly chopped
3 tablespoons raw honey
generous pinch of sea salt

Mix well and spread on teflex sheets and dehydrate 12 hours or overnight at 110 until crunchy. Stir after a few hours to form clusters.  Store in airtight container.  Serves 4-6.


There are many great recipes to be found for all kinds of granola's, baked and dehydrated, and also some shaped cereals if you  really want to get creative.  I like the simplicity of the above cereals and the fact that both require few ingredients and I get to control the quality of the ingredients!  Having your kids help in preparing home made cereals is a great shared activity and it's one way to get them to want to eat them instead of the boxed brands they are used to.

Next post I will be sharing some delicious raw snacks made in the dehydrator.  Hope everyone had a fabulous weekend!


Sunday, November 11, 2012

Raw cookies, cereal and snacks part 1


My mission here is to prove that eating "raw" doesn't have to be boring.  It is believed by some that cooking food destroys it's enzymes and nutrients and chemically changes food making it harder for us to digest and thus contributes to health problems. Raw food is the least processed of food.   Many people have found that following a raw food diet has helped them with digestive problems, has improved their energy levels and helped them to recover from serious illnesses.  Some have claimed it has reversed their type 2 diabetes, lowered their cholesterol and blood pressure, and some have even attributed it to curing their cancer!  One thing is for sure, a raw diet is alkalizing and an alkaline body is a healthy body.  Here is a good article about the benefits of alkalizing the body.

I am by no means a  raw foodist, nor am I vegetarian or vegan.  I have had a few people ask me if I eat meat.  Yes I do eat some meat, I see nothing morally wrong or unhealthy about eating meat, but I do believe it has to be organically and traditionally raised and should be eaten sparingly.  Even the Dalai Lama has been said to eat some meat for health reasons!  Having said this, I do try to follow a diet that is highly raw and vegan.  Most people who switch to a raw and unprocessed diet have found they were able to lose weight without really trying.

There is a misconception that a raw diet consists of only raw fruits and vegetables, but that's not true.  There are some raw diets that include meat , but I won't get into that aspect.  The most common raw diet is made up of plant matter and includes seeds, nuts and grains.  Food starts to lose it's nutritional value once it's heated over 115 degrees, and it's for this reason that many raw foodists use a dehydrator to "cook" their food.  When dehydrated properly, food retains 95% of it nutrition and enzymes.

Eating raw is anything but boring so get that image of nibbling on carrot and celery sticks out of your head.  There are many recipes available for things like pizza, cakes and deserts, breads, granola's, crackers, etc.  A favorite of mine is cookies!
 
Apple Walnut Raisin Chunkie Dunkie recipe here.
These chunkie dunkies  are absolutely delicious and I would kill for her other recipes!

These ones are pretty tasty too.

Lemon Pie Cookie Bites


 *Lemon Pie Cookie Bites*

3/4 cup fresh lemon juice
1/4 cup fresh lemon zest
2 cups raw cashews, ground into flour
2 cups shredded unsweetened coconut
1/4 cup raw honey
pinch of sea salt

Process everything in blender or food processor until smooth.  Scoop onto mesh dehydrator screens and dry at 110 for 8-10 hours.

warning:  these are seriously tart and lemony!


These next cookies are sweetened with dates and have no added fats and can be left undehydrated and just stored in the fridge.  To make them healthier, I've used walnuts that I soaked and dehydrated.

Raw Brownie Bites

*Raw Brownie Bites*

1 1/2 cups walnuts
1/2 teaspoon of vanilla powder - I used 1 vanilla bean, split and scraped; discard pod
dash sea salt
3/4 cup soft dates, packed
1/3 cup raw cacao powder
2 teaspoons filtered water
1/3 cup chopped walnuts

In food processor pulse and process using S blade the 1 1/2 cups walnuts, vanilla powder/pulp, and salt to make a rough flour.  Add dates and process till well mixed; add cacao and water and process till it forms a dough.  Remove processor blade and stir in the chopped nuts.  At this point you can form into balls and refrigerate or you can scoop onto dehydrator screens and dehydrate at 110 for about 12 hours.

Stay tuned for part 2!